Integrating your wishlist with Shopify Flow allows you to build powerful, no-code automations based on customer intent and wishlist triggers. By connecting these two apps, you can easily tag high-value shoppers, send specialized team alerts, or automate customer retention tasks without writing a single line of code.
Prerequisites
Before setting up your automations, verify your store meets the following requirements:
Hulk Advanced Wishlist Subscription: Ensure you are subscribed to the appropriate app plan that unlocks access to the advanced Shopify Flow integration connector.
Shopify Plan Eligibility: Shopify Flow is completely free and fully accessible to all merchants on any paid Shopify plan, including Basic, Shopify, Advanced, and Shopify Plus.
Installation: Make sure both the Hulk Advanced Wishlist app and the native Shopify Flow app are installed from the Shopify App Store.
Step 1: Create a New Workflow
From your Shopify Admin dashboard, go to Apps and open Shopify Flow.
In the top-right corner of the workspace, click the Create workflow button.
Step 2: Define Your Trigger
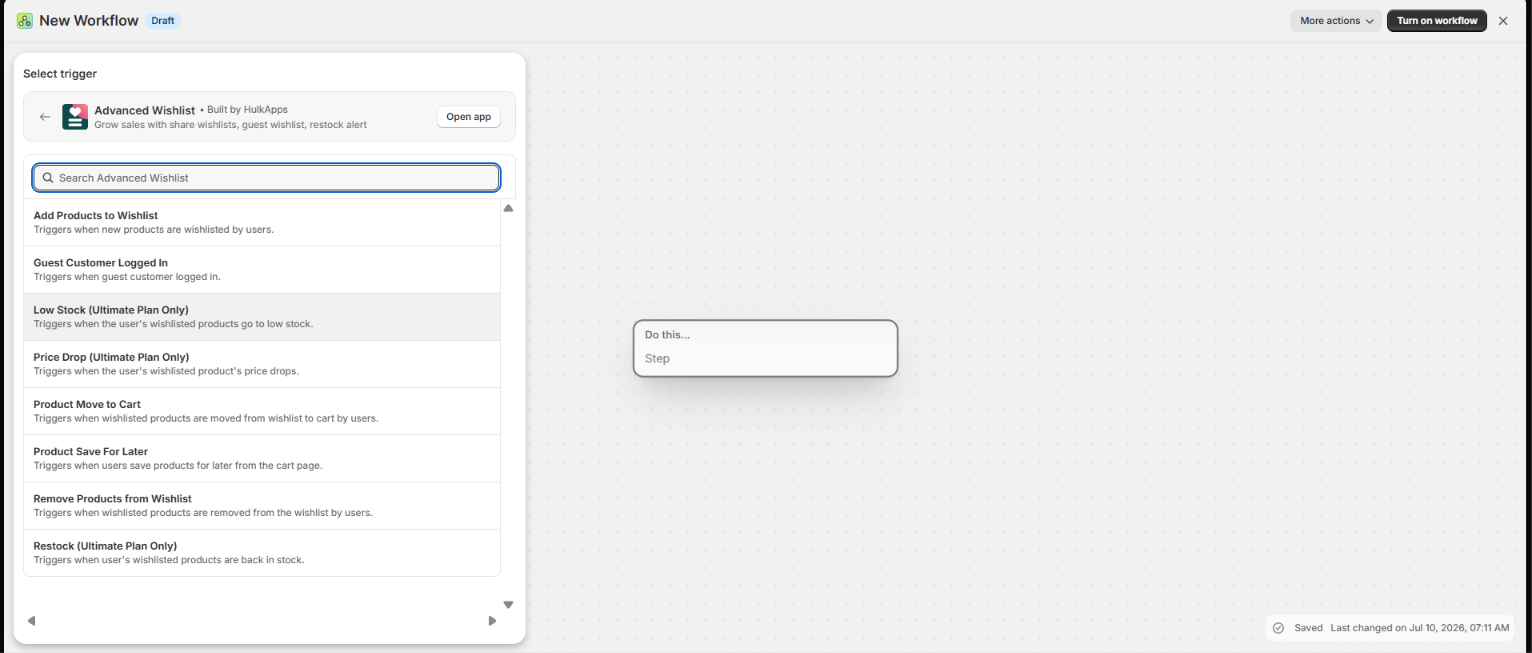
Click on the Select a trigger box to open the configuration side panel.
From the list of available application connectors, select Hulk Advanced Wishlist.
Choose the specific user interaction event you want to start your automation sequence:
Product added to wishlist: Fires the exact moment a shopper saves an item to a list.
Product removed from wishlist: Fires when an item is deleted from a user's board.
Product added to cart page from wishlist: Fires when a customer moves a saved item to their active shopping cart.
Saved for Later from cart page to wishlist page: Fires when a shopper shifts an item from their cart back to their wishlist.
Wishlisted product price dropped: Triggers automatically when an item on a shopper's list goes on sale.
Wishlisted product is back in stock: Triggers when an unavailable item on a list is replenished.
Wishlisted product is low in stock: Fires when inventory for a wishlisted variant drops below safe thresholds.
Step 3: Define Your Conditions
Click the + icon on the workflow canvas and select Condition.
Set the custom rule properties that must be met for the action to trigger. For example, if using the Wishlisted product price dropped trigger, you can create a rule stating the price drop must be greater than 20%.
The Hulk Advanced Wishlist connector passes the following data variables to your Flow canvas to use in your conditions:
User email address
Product ID and Product Title
Variant ID and Variant Title
Variant SKU
Product Price
Product Quantity
Product Vendor
Product Type
Product URL, Image URL, and Variant Image URL
Step 4: Define Your Actions
Click the Then or + branch connected to your successful condition criteria and select Action.
Select the final event you want your store to execute automatically.
You can chain multiple actions to a single trigger. For example, when a product is added to a wishlist, you can simultaneously:
Add customer tags (e.g., tag a user as a high-intent shopper).
Send an internal notification email to your marketing team.
Send data directly to third-party tools like Slack or Google Sheets.
Step 5: Save and Enable the Workflow
Give your workflow a descriptive name in the top title area.
Click Turn on workflow (or Save) in the top-right corner.
Confirm the activation to let your new automation run live in real-time.
Was this article helpful?
That’s Great!
Thank you for your feedback
Sorry! We couldn't be helpful
Thank you for your feedback
Feedback sent
We appreciate your effort and will try to fix the article
